I spent the last week or so creating a lab environment I intend to use for researching vulnerabilities in websites and web applications for submission to bug bounty programs. This post contains the details of creating the lab, as well as documenting a few failed attempts.
Goals
As I investigated how to get started with bug bounty research, I decided that it would be best to have a controlled way that I interact with the targets. So, I wanted to set up a lab to use for the research. Here are the goals for the lab:
Log All Web Traffic
When I start researching a new target, I plan to explore it interactively to get familiar with the functionality. As I do this exploration, I need this traffic to be fully logged.
If it were not logged, I'd have to take meticulous notes about what I am doing so I can come up with reproduction recipes when I do discover vulnerabilities. With traffic logging, I can just refer to the log and recreate the recipe from the log.
With the logged traffic in hand, I can also run all sorts of offline tools, again and again, to find further areas of research. Without this logged traffic, I'd have to resort to dynamic scanning tools that I'm hesitant to use for bug bounty research.
For one, a lot of the bug bounty programs prohibit scanning due to the annoying and disruptive nature of it. Further, dynamic scanning can also lead to other issues, as the next section discusses.
IP Reputation Protection
I've read a number of stories where your IP ends up being classified, by some automated system, as possibly malicious. This post is a recent, interesting example. This can lead to connectivity issues or annoying speed bumps, designed to prove the traffic is not being generated by a bot.
I've also read a number of posts about Google just locking your account, with no warning and with no recourse. The account locking is done via an automated system specifically designed to withstand abuse. So it (sort of) makes sense there is nothing an end-user can do about a locked account. There are a lot of reasons this can happen, but I'm convinced that one of the reasons is due to IP reputation discoveries made by Google's automation. Of course, I have no evidence to support this, just a hunch.
During my research, I'd like to avoid triggering a denial-of-service (DoS) for my home network, or worse locking myself out of my Google account.
One obvious way to meet this requirement is to route my traffic through a VPN with an exit node running in a public cloud. I may still trigger IP reputation issues with my research, but in theory, I could provision a new exit node to resolve the issue.
Semi-automated Provisioning and Deployment
I'd like to be able to quickly spin up and down the lab, in a semi-automated manner, for a few reasons:
- An automated deployment of the exit node will control costs.
- The exit node would be cheap to run 24x7 because the cheapest instance is sufficient to route traffic. However, I can control costs further by turning off the exit node when not in use.
- I can install tools in the lab, change config, etc. without worrying about keeping track of changes
- If I install the wrong tool that messes up the lab environment, I can just redeploy.
Isolated Sandbox
In my research, I'm going to use dedicated accounts for email, identity providers, and browser logins. I'd like to avoid mistakenly using these accounts when not doing researching.
As a result, I'd like the lab to make it very unlikely that I'd use a research account outside the lab and an actual account inside the lab.
I'm going to meet this goal in two ways:
- Use Firefox for browsing, with a Firefox account for storing passwords and bookmarks
- Use a virtual Linux desktop to run Firefox
Non-Goals
Anonymity
All of my research will be done following the rules of a bug bounty program. Given that, I have no need to maintain the anonymity of the source of my research traffic. I am even considering setting up an obvious domain that points to the exit node so reverse lookups on the IP of the traffic clearly points to me and the intent of bug bounty research.
Dynamic Scanning Capabilities
As I mentioned earlier, I don't plan to rely on dynamically scanning targets since it is against a lot of bug bounty program's rules. Further, scanning tends to uncover low hanging fruit with fixes pending that other researchers have already found. Finding low hanging fruit is not my intent 😀.
Architecture
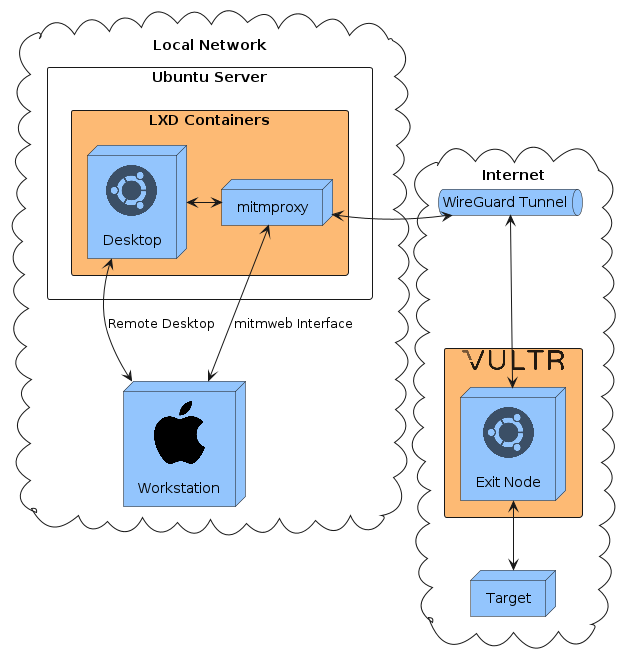
On my local network, I use a Macbook Air (M1, 2020) with 16 GiB of RAM as my workstation. I also have a ASRock NUC BOX-116567 with 64 GiB of RAM that runs Ubuntu Server 22.04, which functions as a x86-64 box and a place to run RAM heavy workloads.
Technology Decisions
I ended up using the following technologies to build this lab:
- LXD for running containers
- Ansible for host provisioning
- Packer to orchestrate the creation of LXD images using Ansible
- mitmproxy for capturing traffic
- WireGuard for implementing a simple, two node VPN
- Vultr for hosting the exit node for the VPN
- Terraform for provisioning the exit node via Vultr APIs
LXD
LXD is a suite of tools for running system containers. A system container is one in which a full Linux distribution is installed and the primary process is an init process such as systemd. This is in contrast to application containers, used by Docker and similar container runtimes, that are designed to run a single primary process. (This is a good page that discusses this terminology.)
One particular nice aspect of LXD is that it provides more sophisticated tools for managing the network properties of a container. This is really useful for this project as there is a lot of IP packet routing involved.
Additionally, I have a fair amount of experience with LXD. That definitely factored into my decision to use it.
Ansible
Ansible is a configuration management tool for provisioning hosts, using a declarative configuration describing the tasks required to provision the host. Ansible emphasizes making a provisioning process idempotent. This emphasis comes in handy when orchestrating hosts across multiple networks, such as the local network and public cloud network in the lab architecture.
There are a ton of configuration management tools out there. I'm most familiar with Ansible so that's why I picked it.
Packer
Packer is a Hashicorp tool that automates the creation of "golden" images for containers and VMs. I hadn't used this tool before this project, but knew it was very useful for creating images.
I was pleasantly surprised to see that it had official support for interfacing with both LXD and Ansible. I have previously used ad-hoc scripts for the same purpose as Packer, and I was glad to eliminate that ad-hoc scripting in favor of Packer for this project.
mitmproxy
mitmproxy is a popular tool for intercepting network traffic for the purposes of logging and modification. I selected the mitmproxy because it supports a transparent mode where it can intercept traffic at the network layer, with the help of OS-level packet forwarding.
This capability allowed the desktop container to be minimally aware of the traffic capture. This aspect was particularly important to me because it ensures that all web traffic will be logged without any extra effort on my part.
WireGuard
I landed on WireGuard for the two-node VPN between the exit node and proxy node due to simplicity. I spent some time trying out Tailscale, a management layer on top of WireGuard, but decided against it. I go more into this decision in the False Starts section.
Terraform
Terraform is another Hashicorp tool that, among many capabilities, automates management of resources in public cloud environments. It allowed me to automate the creation and destruction of the exit node.
Vultr
I went with Vultr for public cloud compute hosting for a few reasons:
- The smallest compute instance is competitively priced
- Compute is charged hourly
- Bandwidth charges are included with compute instances and are quite generous at 2 TB/month of egress for free.
- Terraform support
Component Details
There are three main components to the lab:
- An Ubuntu desktop container
- A container running mitmproxy
- A WireGuard exit node running on a Vultr instance
Ubuntu Desktop
The Ubuntu desktop node is provisioned with the following Packer template:
packer {
  required_plugins {
    lxd = {
      version = ">= 1.0.0"
      source  = "github.com/hashicorp/lxd"
    }
  }
}

variable "lxd_remote" {
    description = "The LXD remote name"
    type = string
}

source "lxd" "whitehat-client" {
  image = "jammy"
  container_name = "whitehat-client"
  output_image = "whitehat-client"
  publish_properties = {
    description = "whitehat client image"
  }
}

build {
  name = "whitehat-client"
  sources = [
    "source.lxd.whitehat-client"
  ]
  provisioner "ansible" {
    playbook_file = "./site.yml"
    extra_arguments = [
        "--extra-vars",
        "ansible_connection=lxd ansible_lxd_remote=${var.lxd_remote} ansible_host=whitehat-client"
    ]
  }
}
The key parts of the template are:
- Line
16tells LXD to use a pre-existing image namedjammy, which I previously downloaded to my local LXD machine. - Line
30tells Packer to use a specific Ansible playbook to provision the host - Line
33defines some important extra variables to pass toansible-playbookthat tell it:- To use LXD for connecting to the machine, instead of the default SSH.
- To use a LXD remote name provided on the command line
- To connect to a LXD container, launched by Packer, named
whitehat-client
The ansible playbook ended up being fairly simple. I'll explain it, piece by piece:
# Standard playbook setup omitted
tasks:
  - name: Install net-tools
    apt:
      name: net-tools
      state: present
      update_cache: yes
  - name: Install net-tools
    apt:
      name: net-tools
      state: present
      update_cache: yes
  - name: Install nmap
    apt:
      name: nmap
      state: present
  - name: Install ncat
    apt:
      name: ncat
      state: present
  - name: Install traceroute
    apt:
      name: inetutils-traceroute
      state: present
These Ansible tasks install some useful tools for troubleshooting networking and probing webservers. It's important to install these network tools at image provisioning time as the lab containers are locked down from a networking perspective once launched.
- name: Install xfce
  apt:
    name: xfce4
    state: present
- name: Remove xfce4-screensaver
  apt:
    name: xfce4-screensaver
    state: absent
- name: Set up default xfce4 panel
  copy:
    src: files/xfce4-panel-default.xml
    dest: /etc/xdg/xfce4/panel/default.xml
    owner: root
    group: root
    mode: '0644'
I went with XFCE for my window manager as it is very lightweight, and I have a fair amount of experience with it already.
- name: Install xrdp
  apt:
    name: xrdp
    state: present
- name: Enable xrdp
  systemd:
    name: xrdp
    enabled: yes
    daemon-reload: yes
- name: Copy xrdp cert (1/2)
  copy:
    src: files/client.lan.test.crt
    dest: /etc/xrdp/cert.pem
    owner: root
    group: root
    mode: '0644'
- name: Copy xrdp cert (1/2)
  copy:
    src: files/client.lan.test.key
    dest: /etc/xrdp/key.pem
    owner: xrdp
    group: ssl-cert
    mode: '0640'
These tasks install xrdp to enable remote access to the desktop environment. I went with xrdp because it implements the Microsoft Remote Desktop Protocol, and I've found that Microsoft's official Remote Desktop client to be the most stable and feature-rich remote access client available on macos. I've tried VNC in the past and ran into copy-paste support issues so I wanted to avoid VNC for this project.
Surprisingly, xrdp did not require any further configuration work. Took me a while to figure that out! I was expecting it to be more involved. More on that in False Starts.
The 3rd and 4th tasks configure xrdp to use TLS certs signed by a local CA I created as part of this project. More details on the CA in a future post.
# snap install firefox is broken in a LXC container
# Workaround from https://bugs.launchpad.net/ubuntu/+source/firefox/+bug/1994453
- name: Add Mozilla PPA
  apt_repository:
    repo: ppa:mozillateam/ppa
- name: Copy mozilla-firefox override
  copy:
    src: files/mozilla-firefox
    dest: /etc/apt/preferences.d/mozilla-firefox
    mode: '0644'
- name: Install firefox
  apt:
    name: firefox
    state: present
These tasks install Firefox. The preferred way to install Firefox on Ubuntu is to use a snap, but that wasn't working due to a known issue. So, I fell back to using the Mozilla PPA.
And that's it! Seems straightforward? Running the Packer build results in a LXD image being available named whitehat-client.
mitmproxy Provisioning
The proxy node image is also created with Packer, Ansible and LXD. I won't include the Packer template as it is basically identical to the desktop template.
Here's the Ansible playbook, again piece by piece:
# Standard playbook setup omitted
- name: Install wireguard
  apt:
    name: wireguard
    state: present
    update_cache: yes
- name: Install net-tools
  apt:
    name: net-tools
    state: present
- name: Install nmap
  apt:
    name: nmap
    state: present
- name: Install ncat
  apt:
    name: ncat
    state: present
- name: Install traceroute
  apt:
    name: inetutils-traceroute
    state: present
These tasks install the same network troubleshooting tools as the desktop image. Also, install WireGuard.
- name: Install nginx
  apt:
    name: nginx
    state: present
- name: Copy nginx.conf
  copy:
    src: files/nginx.conf
    dest: /etc/nginx/nginx.conf
    owner: root
    group: root
    mode: '0644'
- name: Make nginx TLS cert directory
  file:
    path: /etc/nginx/pki
    state: directory
    mode: '0755'
- name: Copy TLS cert (1/2)
  copy:
    src: files/proxy.lan.test.crt
    dest: /etc/nginx/pki/proxy.lan.test.crt
    mode: '0644'
- name: Copy TLS cert (2/2)
  copy:
    src: files/proxy.lan.test.key
    dest: /etc/nginx/pki/proxy.lan.test.key
    mode: '0600'
- name: Copy client cert root CA
  copy:
    src: files/root-ca.crt
    dest: /etc/nginx/pki/root-ca.crt
    mode: '0644'
These tasks install nginx, set it up to use TLS and require a client certificate, signed by the root CA for the lab, for access.
This nginx setup is required because the mitmproxy web interface, mitmweb, doesn't support any sort of authentication natively. This was worrisome to me as mitmweb can be instructed to generate effectively arbitrary HTTP requests. I did not want to make that service available on my local network without authentication.
- name: Download mitmproxy binaries
  get_url:
    url: https://snapshots.mitmproxy.org/9.0.1/mitmproxy-9.0.1-linux.tar.gz
    dest: /home/ubuntu/
    mode: '0444'
- name: Unpack mitmproxy binaries
  unarchive:
    src: /home/ubuntu/mitmproxy-9.0.1-linux.tar.gz
    dest: /usr/local/bin
    remote_src: yes
- name: Copy mitmproxy.service
  copy:
    src: files/mitmproxy.service
    dest: /etc/systemd/system
    mode: '0644'
- name: Set up mitmproxy service
  systemd:
    name: mitmproxy
    enabled: yes
    daemon-reload: yes
These tasks install mitmproxy 9.0.1, and enable it as a systemd service. I had to write the systemd service unit file, but it wasn't too involved.
- name: Install iptables-persistent
  apt:
    name: iptables-persistent
    state: present
- name: Enable IP forwarding (1/2)
  sysctl:
    name: net.ipv4.ip_forward
    value: '1'
    state: present
    sysctl_set: yes
- name: Enable IP forwarding (2/2)
  sysctl:
    name: net.ipv6.conf.all.forwarding
    value: '1'
    state: present
    sysctl_set: yes
- name: Disable ICMP redirects
  sysctl:
    name: net.ipv4.conf.all.send_redirects
    value: '0'
    state: present
    sysctl_set: yes
- name: Forward port 80 to 8080 (IPv4)
  iptables:
    ip_version: ipv4
    table: nat
    chain: PREROUTING
    in_interface: eth0
    protocol: tcp
    match: tcp
    destination_port: 80
    jump: REDIRECT
    to_ports: 8080
- name: Forward port 443 to 8080 (IPv4)
  iptables:
    ip_version: ipv4
    table: nat
    chain: PREROUTING
    in_interface: eth0
    protocol: tcp
    match: tcp
    destination_port: 443
    jump: REDIRECT
    to_ports: 8080
- name: Forward port 80 to 8080 (IPv6)
  iptables:
    ip_version: ipv6
    table: nat
    chain: PREROUTING
    in_interface: eth0
    protocol: tcp
    match: tcp
    destination_port: 80
    jump: REDIRECT
    to_ports: 8080
- name: Forward port 443 to 8080 (IPv6)
  iptables:
    ip_version: ipv6
    table: nat
    chain: PREROUTING
    in_interface: eth0
    protocol: tcp
    match: tcp
    destination_port: 443
    jump: REDIRECT
    to_ports: 8080
- name: Persist iptables rules
  command:
    cmd: netfilter-persistent save
These tasks use iptables to forward all web traffic routed through the proxy node through the mitmproxy process. These steps are basically right out of the transparent proxying guide from the mitmproxy docs, translated into Ansible tasks instead of shell commands.
I had to sort out using iptables-persistent to ensure that the iptables rules are applied when a container is launched from the resulting image.
That's it for the proxy node. Running the Packer build produces a LXD image named whitehat-proxy.
Exit Node
As mentioned earlier, the exit node is provisioned using Terraform. Some basic set up is performed using cloud-init once the Vultr instance is launched.
Here's the Terraform configuration:
terraform {
    required_providers {
        vultr = {
            source = "vultr/vultr"
            version = ">= 2.10.1"
        }
    }
}

# Set TF_VAR_VULTR_API_KEY via environment variable
variable "VULTR_API_KEY" {
    description = "Vultr API key"
    type = string
}

provider "vultr" {
    api_key = var.VULTR_API_KEY
}

resource "vultr_instance" "wireguard_exit_node" {
    plan = "vc2-1c-1gb"
    region = "ord"
    os_id = 1743
    enable_ipv6 = false
    user_data = file("${path.module}/userdata.yaml")
}
The key part of the config is the resource definition for the vultr_instance. In particular:
- Use the instance plan
vc2-1c-1gb, the cheapest Vultr instance - Use the region
ord(i.e. Chicago), as it is the closest data center 1743is the ID for Ubuntu Server 22.04
The user data is also pretty simple:
#cloud-config

ssh_pwauth: false
ssh_authorized_keys:
  - ssh-ed25519 <REDACTED>

packages:
  - wireguard
  - net-tools
  - ncat
  - inetutils-traceroute
The config installs some standard packages, most importantly WireGuard.
My SSH public key is installed for the root user and SSH password authentication is disabled. Using root is preferred because:
- All the provisioning of WireGuard needs to be done as root
- I don't intend to log into the Vultr instance once provisioned
- The default ubuntu user does not need sudo
- The configuration of the WireGuard tunnel configures the host firewall to deny SSH traffic from the Internet
Launching the Containers
With the images for the desktop and proxy node created, I wrote a script to launch the images as LXD containers. Here are the relevant pieces of that script:
function get_container_ip() {
  local name=$1
  local var_name=$2

  while true; do
    ip=$(lxc query /1.0/containers/"$name"/state | jq -r '.network.eth0.addresses | map(select(.family == "inet"))[0].address')
    if [[ ! "$ip" =~ ^[[:digit:]]+.[[:digit:]]+.[[:digit:]]+.[[:digit:]]+$ ]]; then
      echo "IP for $name not yet available"
      sleep 1
    else
      break
    fi
  done

  export "${var_name}_ip"="$ip"
}
This function queries for a particular container to get the IP LXD assigned it via DHCP on the dedicated bridge network. This assignment may take a few seconds so it tries again if the IP is not yet available.
lxc launch -p isolated whitehat-proxy whitehat-proxy
get_container_ip whitehat-proxy whitehat_proxy
export PROXY_IP="${whitehat_proxy_ip}"

lxc launch -p isolated whitehat-client whitehat-client
get_container_ip whitehat-client whitehat_client
These commands launch the containers and determine their IPs. A LXD profile is used to assign the containers to a dedicated bridge network. This will come into play when setting up the WireGuard tunnel and restricting all traffic to be routed over the WireGuard tunnel.
lxc config device override whitehat-proxy eth0 ipv4.address="${whitehat_proxy_ip}"
lxc config device add whitehat-proxy mitmweb proxy nat=true listen=tcp:"$host_ip":9111 connect=tcp:"${whitehat_proxy_ip}":8443
These commands set up the proxy type device that exposes the mitmproxy web interface on the LXD container host. $host_ip is set to a constant at the beginning of the script.
envsubst < proxy/files/10-netplan-eth0.network.subst \
| lxc file push --uid=0 --gid=0 --mode=644 - whitehat-proxy/etc/systemd/network/10-netplan-eth0.network
lxc exec whitehat-proxy -- networkctl reload
lxc exec whitehat-proxy -- networkctl reconfigure eth0
The WireGuard set up will change the routing configuration so that the default route uses the WireGuard interface. These commands ensure that there continues to be a more specific route present that will route return traffic for the local network over the LXD bridge network.
The config file, /etc/systemd/network/10-netplan-eth0.network, instructs systemd-networkd to add that route when reconfiguring the networking. Here are the contents of that file:
[Match]
Name=eth0

[Network]
DHCP=ipv4
LinkLocalAddressing=ipv6

[DHCP]
RouteMetric=100
UseMTU=true

[Route]
Gateway=_dhcp4
Destination=192.168.1.0/24
The name of the file is super important, it turns out! The handling of the configuration files has a precedence rule where an /etc/systemd/network file can override another configuration, but only if it has the same name. When LXD launches a container, it mounts the configuration for the network at /run/systemd/network/10-netplan-eth0.network. Once the config is installed, networkctl reload instructs the systemd-networkd daemon to re-read its config, and then reconfigure eth0 refreshes the networking configuration for the eth0 interface.
That completes the set up of the proxy node. On to the desktop:
lxc config device override whitehat-client eth0 ipv4.address="${whitehat_client_ip}"
lxc config device add whitehat-client rdp proxy nat=true listen=tcp:"$host_ip":3389 connect=tcp:"${whitehat_client_ip}":3389
Similar to the proxy node, these commands expose the RDP service running on the desktop node to the local network.
envsubst < client/files/10-netplan-eth0.network.subst \
| lxc file push --uid=0 --gid=0 --mode=644 - whitehat-client/etc/systemd/network/10-netplan-eth0.network
lxc exec whitehat-client -- networkctl reload
lxc exec whitehat-client -- networkctl reconfigure eth0
The 10-netplan-eth0.network file is a bit different for the desktop:
[Match]
Name=eth0

[Network]
DHCP=ipv4
LinkLocalAddressing=ipv6
Gateway=${PROXY_IP}

[DHCP]
RouteMetric=100
UseMTU=true

[Route]
Gateway=_dhcp4
Destination=192.168.1.0/24
The difference is the Gateway key-value pair under the [Network] section. This tells systemd-networkd that it should add a default route that uses the specified IP, in addition to the route using the gateway provided by DHCP. The source here is post-processed by envsubst so the actual file on the LXD container would contain: Gateway=10.46.21.68.
Setting up the WireGuard Tunnel
With the LXD containers launched and the exit node provisioned via Vultr, I run another script and an Ansible playbook to setup the WireGuard tunnel.
The script is a light wrapper around an execution of the Ansible playbook. Here's the important bit:
# Allow wireguard traffic between the proxy and the gateway
lxc network acl rule add isolated egress action=allow state=enabled \
  source="${proxy_ip}/32" \
  destination="${VULTR_INST_IP}/32"
The command adds a network ACL rule allowing the proxy to send traffic to the WireGuard exit node. The network denies all other egress from the LXD network bridge. This ensures that the only traffic leaving the LXD network goes over the WireGuard tunnel.
This also means when the WireGuard tunnel is unavailable, the LXD containers have no egress connectivity. They can still be reached via the local network services, however. This is the desired behavior and works surprisingly well!
With the network ACL in place, the Ansible playbook is run. Ansible was a really great choice for this step as it easily allows the use of different connection mechanisms to perform the same tasks. That is, it uses a LXD native connection to run commands on the proxy node and SSH to run commands on the exit node.
The playbook relies on an Ansible inventory with two nodes:
vultr-gatewaywhitehat-proxy
Here are the relevant sections of that playbook:
- name: Teardown existing interface
  hosts: all
  tasks:
    - name: Teardown wg0
      command: systemctl stop wg-quick@wg0
      when: "'wg0' in ansible_facts['interfaces']"
This play makes it easy to iteratively tweak the configuration by tearing down the existing WireGuard set up on each host. Ansible already gathers information about the enabled interfaces on each host so the when clause ensures the teardown only runs if necessary.
- name: Generate wireguard keys
  hosts: all
  tasks:
    - name: Copy gen-keys.sh script
      copy:
        src: files/gen-keys.sh
        dest: /root/gen-keys.sh
        owner: root
        group: root
        mode: '0755'
    - name: Generate keys
      command: /root/gen-keys.sh
      register: public_key_out
    - name: Set public key variable
      set_fact:
        public_key: '{{ public_key_out.stdout }}'
These tasks copy a script that is used to generate the WireGuard keypair. The script is then executed, outputting the public key, which is then captured as a Ansible fact. This is used in the next set of tasks to ensure mutual trust between the proxy node and the exit node.
- name: Setup wireguard
  hosts: all
  tasks:
    - name: Install wg0 config
      template:
        src: templates/wg0-{{ ansible_host }}.conf.j2
        dest: /etc/wireguard/wg0.conf
        owner: root
        group: root
        mode: '0644'
    - name: Restarted wg-quick@wg0 && Enable wg-quick@wg0 to bring up wg0 on boot
      systemd:
        name: wg-quick@wg0
        enabled: yes
        daemon-reload: yes
        state: restarted
These tasks install the appropriate config, which is different on each host, and uses the wg-quick utility to bring up the wg0 interface.
Here is the WireGuard config for the proxy node, as an Ansible template:
[Interface]
Address = 172.16.1.2/24
ListenPort = 51820
PostUp = wg set %i private-key /root/wg0-private-key

[Peer]
PublicKey = {{ hostvars['vultr-gateway']['public_key'] }}
AllowedIPs = 0.0.0.0/0
Endpoint = {{ hostvars['vultr-gateway']['ansible_facts']['default_ipv4']['address'] }}:51820
PersistentKeepalive = 25
Not too complicated, but very tricky to get right. Here are the important parts:
- AllowedIPs must be
0.0.0.0/0- This tells WireGuard to configure the routing so that all egress traffic goes over the WireGuard tunnel.
- This is somewhat of a magic value for wg-quick as it sets up the firewall to mark WireGuard packets, and as a result, exclude the encrypted WireGuard traffic from being routed over the WireGuard tunnel.
PersistentKeepaliveshould be set to ensure the state of all the NAT tables between the nodes is maintained when the tunnel is idle.
Here is the WireGuard config for the exit node:
[Interface]
Address = 172.16.1.1/24
ListenPort = 51820
PostUp = wg set %i private-key /root/wg0-private-key

[Peer]
PublicKey = {{ hostvars['whitehat-proxy']['public_key'] }}
AllowedIPs = 172.16.1.2/32
PersistentKeepalive = 25
It's similar to the proxy node, but the differences are:
- No need to set the
Endpointfield as it is set by the proxy node, and the proxy node originates all traffic on the tunnel. AllowedIPsonly needs to be the IP used by the other node on its WireGuard interface.
At this point in execution of the Ansible playbook, the WireGuard tunnel is functional.
The next tasks configure the firewall on the exit node:
- name: Set up firewall on the gateway
  hosts: vultr-gateway
  tasks:
    - name: Get the default interface
      set_fact:
        default_interface: "{{ ansible_facts['interfaces'] | map('regex_search', '^e.*$') | reject('none') | first }}"
The first task determines the name of the default interface via an Ansible filter. The default is not eth0 but enp1s0. Instead of hardcoding the latter value, I decided to dynamically determine the value. I was not (and am still not) familiar with Ansible filters so this took some trial and error to get right.
- name: Disable ufw
  ufw:
    state: disabled
This task disables the firewall so changes can be made, using the standard ufw module.
- name: Enable ufw forwarding
  lineinfile:
    path: /etc/ufw/sysctl.conf
    regexp: '^#?net/ipv4/ip_forward=1$'
    line: 'net/ipv4/ip_forward=1'
- name: Set ufw before.rules for traffic forwarding
  blockinfile:
    path: /etc/ufw/before.rules
    block: |
      *nat
      :POSTROUTING ACCEPT [0:0]
      -A POSTROUTING -s 172.16.1.0/24 -o {{ default_interface }} -j MASQUERADE
      COMMIT
Theses tasks configure ufw to enable IP forwarding, which is required to allow forwarding from the WireGuard interface, wg0, to the primary interface. These steps are right out of the "Examples" section of the ufw-framework manpage, translated into Ansible tasks.
- name: Allow forwarding traffic from wg0
  ufw:
    route: yes
    rule: allow
    if_in: wg0
    if_out: '{{ default_interface }}'
    from: 172.16.1.0/24
- name: Allow traffic from proxy to gateway on wg0
  ufw:
    rule: allow
    direction: in
    interface: wg0
- name: Allow wireguard traffic from anywhere
  ufw:
    rule: allow
    port: 51820
    proto: udp
- name: Deny SSH traffic from anywhere
  ufw:
    rule: deny
    port: 22
    proto: tcp
These tasks define the firewall rules. Their order is important as the rules are applied in configuration order.
The default policy is to deny all ingress traffic, but I still chose to include an explicit disable of SSH as the default Vultr configuration allows SSH. So, if for some reason the default configuration is reapplied, it won't take precedence over this rule.
- name: Enable ufw
  ufw:
    state: enabled
The last task enables the UFW. Here is the output from running ufw status verbose at this point:
Status: active
Logging: off
Default: deny (incoming), allow (outgoing), deny (routed)
New profiles: skip

To                         Action      From
--                         ------      ----
Anywhere on wg0            ALLOW IN    Anywhere
51820/udp                  ALLOW IN    Anywhere
22/tcp                     DENY IN     Anywhere
Anywhere (v6) on wg0       ALLOW IN    Anywhere (v6)
51820/udp (v6)             ALLOW IN    Anywhere (v6)
22/tcp (v6)                DENY IN     Anywhere (v6)

Anywhere on enp1s0         ALLOW FWD   172.16.1.0/24 on wg0
NAT All the Things!
This lab makes heavy use of IP packet forwarding and masquerading to:
- Expose the mitmweb and RDP interfaces on my local network, hosted by the LXD containers
- Route traffic through mitmproxy and the WireGuard tunnel
- Restrict ingress traffic for the WireGuard exit node while still allowing the WireGuard traffic
I found configuring the firewalls and routes appropriately to be the trickiest aspect of this project. Before, I knew just enough about Linux networking to fumble along with basic configs, but I didn't really know how to troubleshoot issues. So, I had to learn how to troubleshoot the issues as part of this project.
Additionally, there ended up being three firewall frontends in use:
iptables: used in mitmproxy documentationnftables: used by LXDufw: used by the Vultr Ubuntu image
So, I needed to learn about each of these frontends to make sense of the configuration and behavior.
I should mention that this configuration works for me. There may be better ways to set up this behavior. If you know of a better way and are so inclined, let me know! I'd definitely be interested to know how this configuration could be improved.
Here are some diagrams that illustrate the various use cases:
LXD Container Services
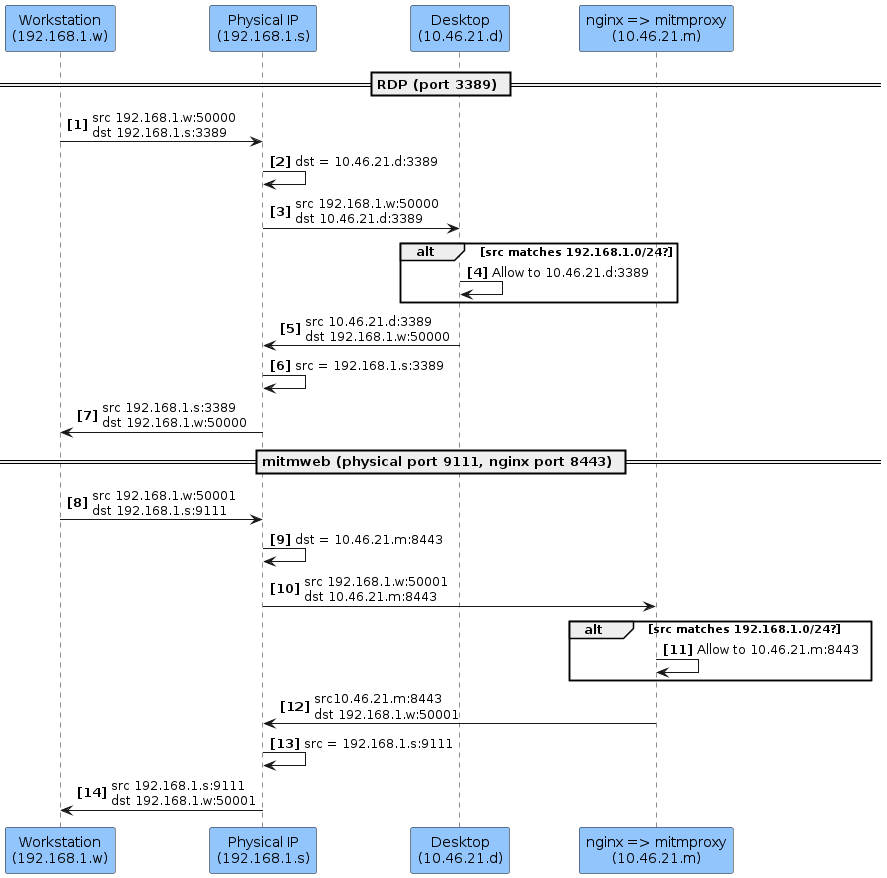
This ended up being a fairly standard network address translation (NAT) setup. LXD has first class support for this use case with its proxy type device. One minor twist is that there needed to be routing rules that send packets to the local host only if the source IP matches 192.168.1.0/24. This guarantees that local traffic does not use the WireGuard tunnel, as discussed in the next section.
mitmproxy Routing Behavior
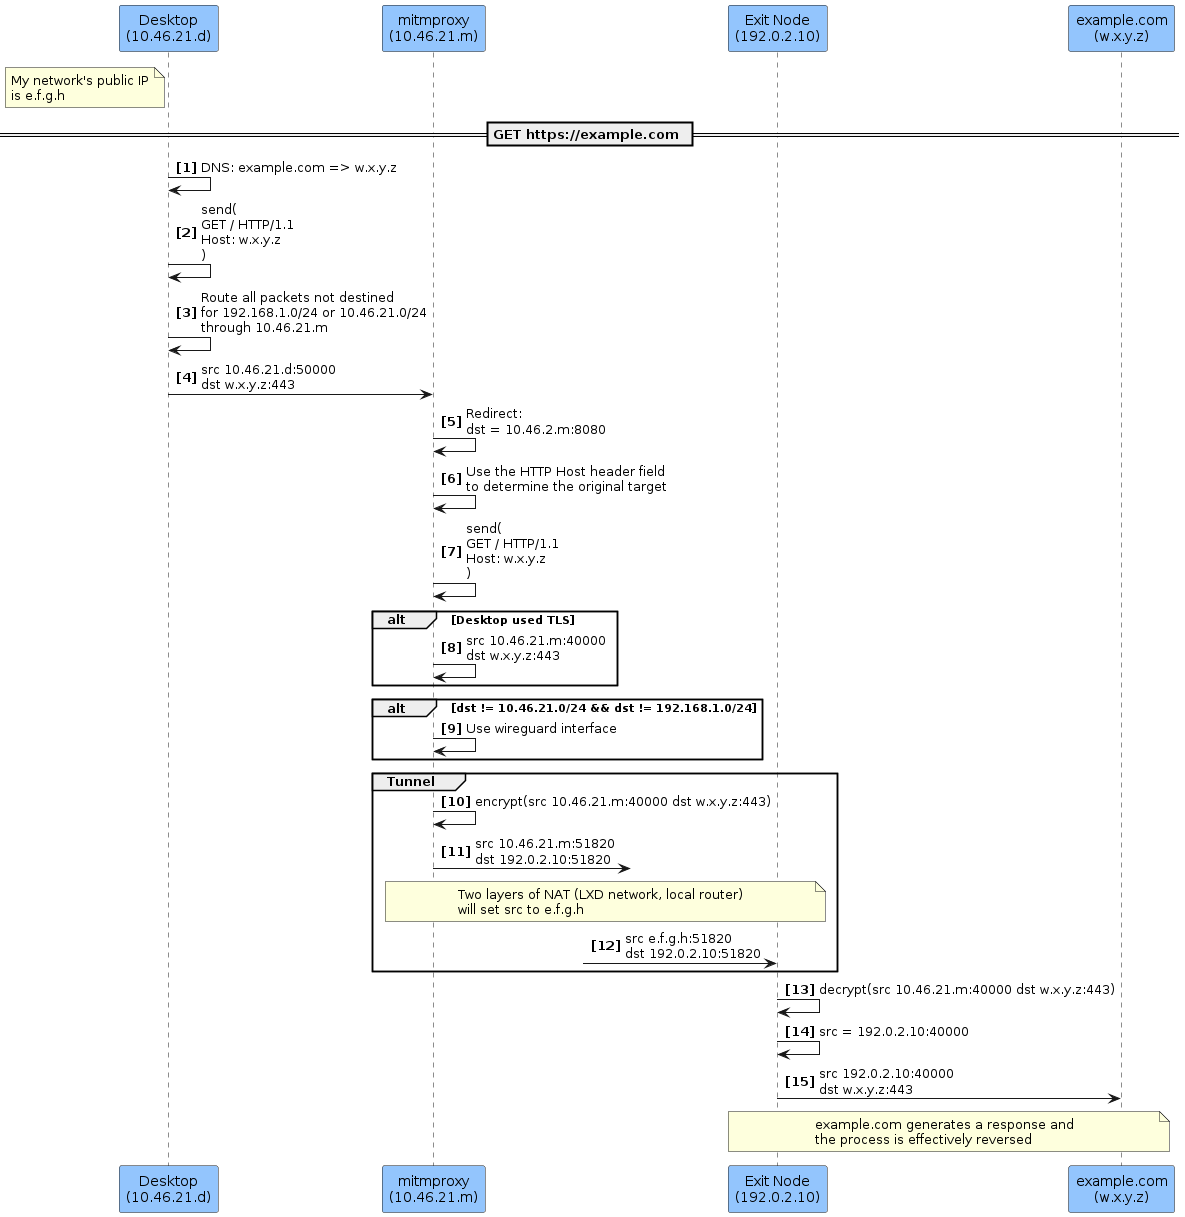
There's a lot going on here. The interesting steps:
Step 3: routing on the desktop node is configured to route through mitmproxyStep 5: the proxy node is configured to redirect all incoming traffic to ports443or80to the mitmproxy server running on port8080Step 6: mitmproxy uses application layer metadata (i.e., the HTTP host header field) to determine where to route requestsStep 9: only traffic for the public Internet is routed over the wireguard interface, allowing services onmitmproxyto still be accessible
Checking the routing configuration
I found that the ip route get <IP> command is very useful for checking the routing rules. Here's some output from running this on the proxy node:
# ip route get 1.1.1.1
1.1.1.1 dev wg0 table 51820 src 172.16.1.2 uid 0
    cache
# ip route get 192.168.1.10
192.168.1.10 via 10.46.21.1 dev eth0 src 10.46.21.68 uid 0
    cache
# ip route get 10.46.21.1
10.46.21.1 dev eth0 src 10.46.21.68 uid 0
    cache
The same commands run on the desktop node:
# ip route get 1.1.1.1
1.1.1.1 via 10.46.21.68 dev eth0 src 10.46.21.160 uid 0
    cache
# ip route get 192.168.1.10
192.168.1.10 via 10.46.21.1 dev eth0 src 10.46.21.160 uid 0
    cache
# ip route get 10.46.21.1
10.46.21.1 dev eth0 src 10.46.21.160 uid 0
    cache
The important route in both cases is the route for a public IP (1.1.1.1 in the examples). For the desktop node, it's routed via the proxy node. For the proxy node, it's routed via the WireGuard tunnel.
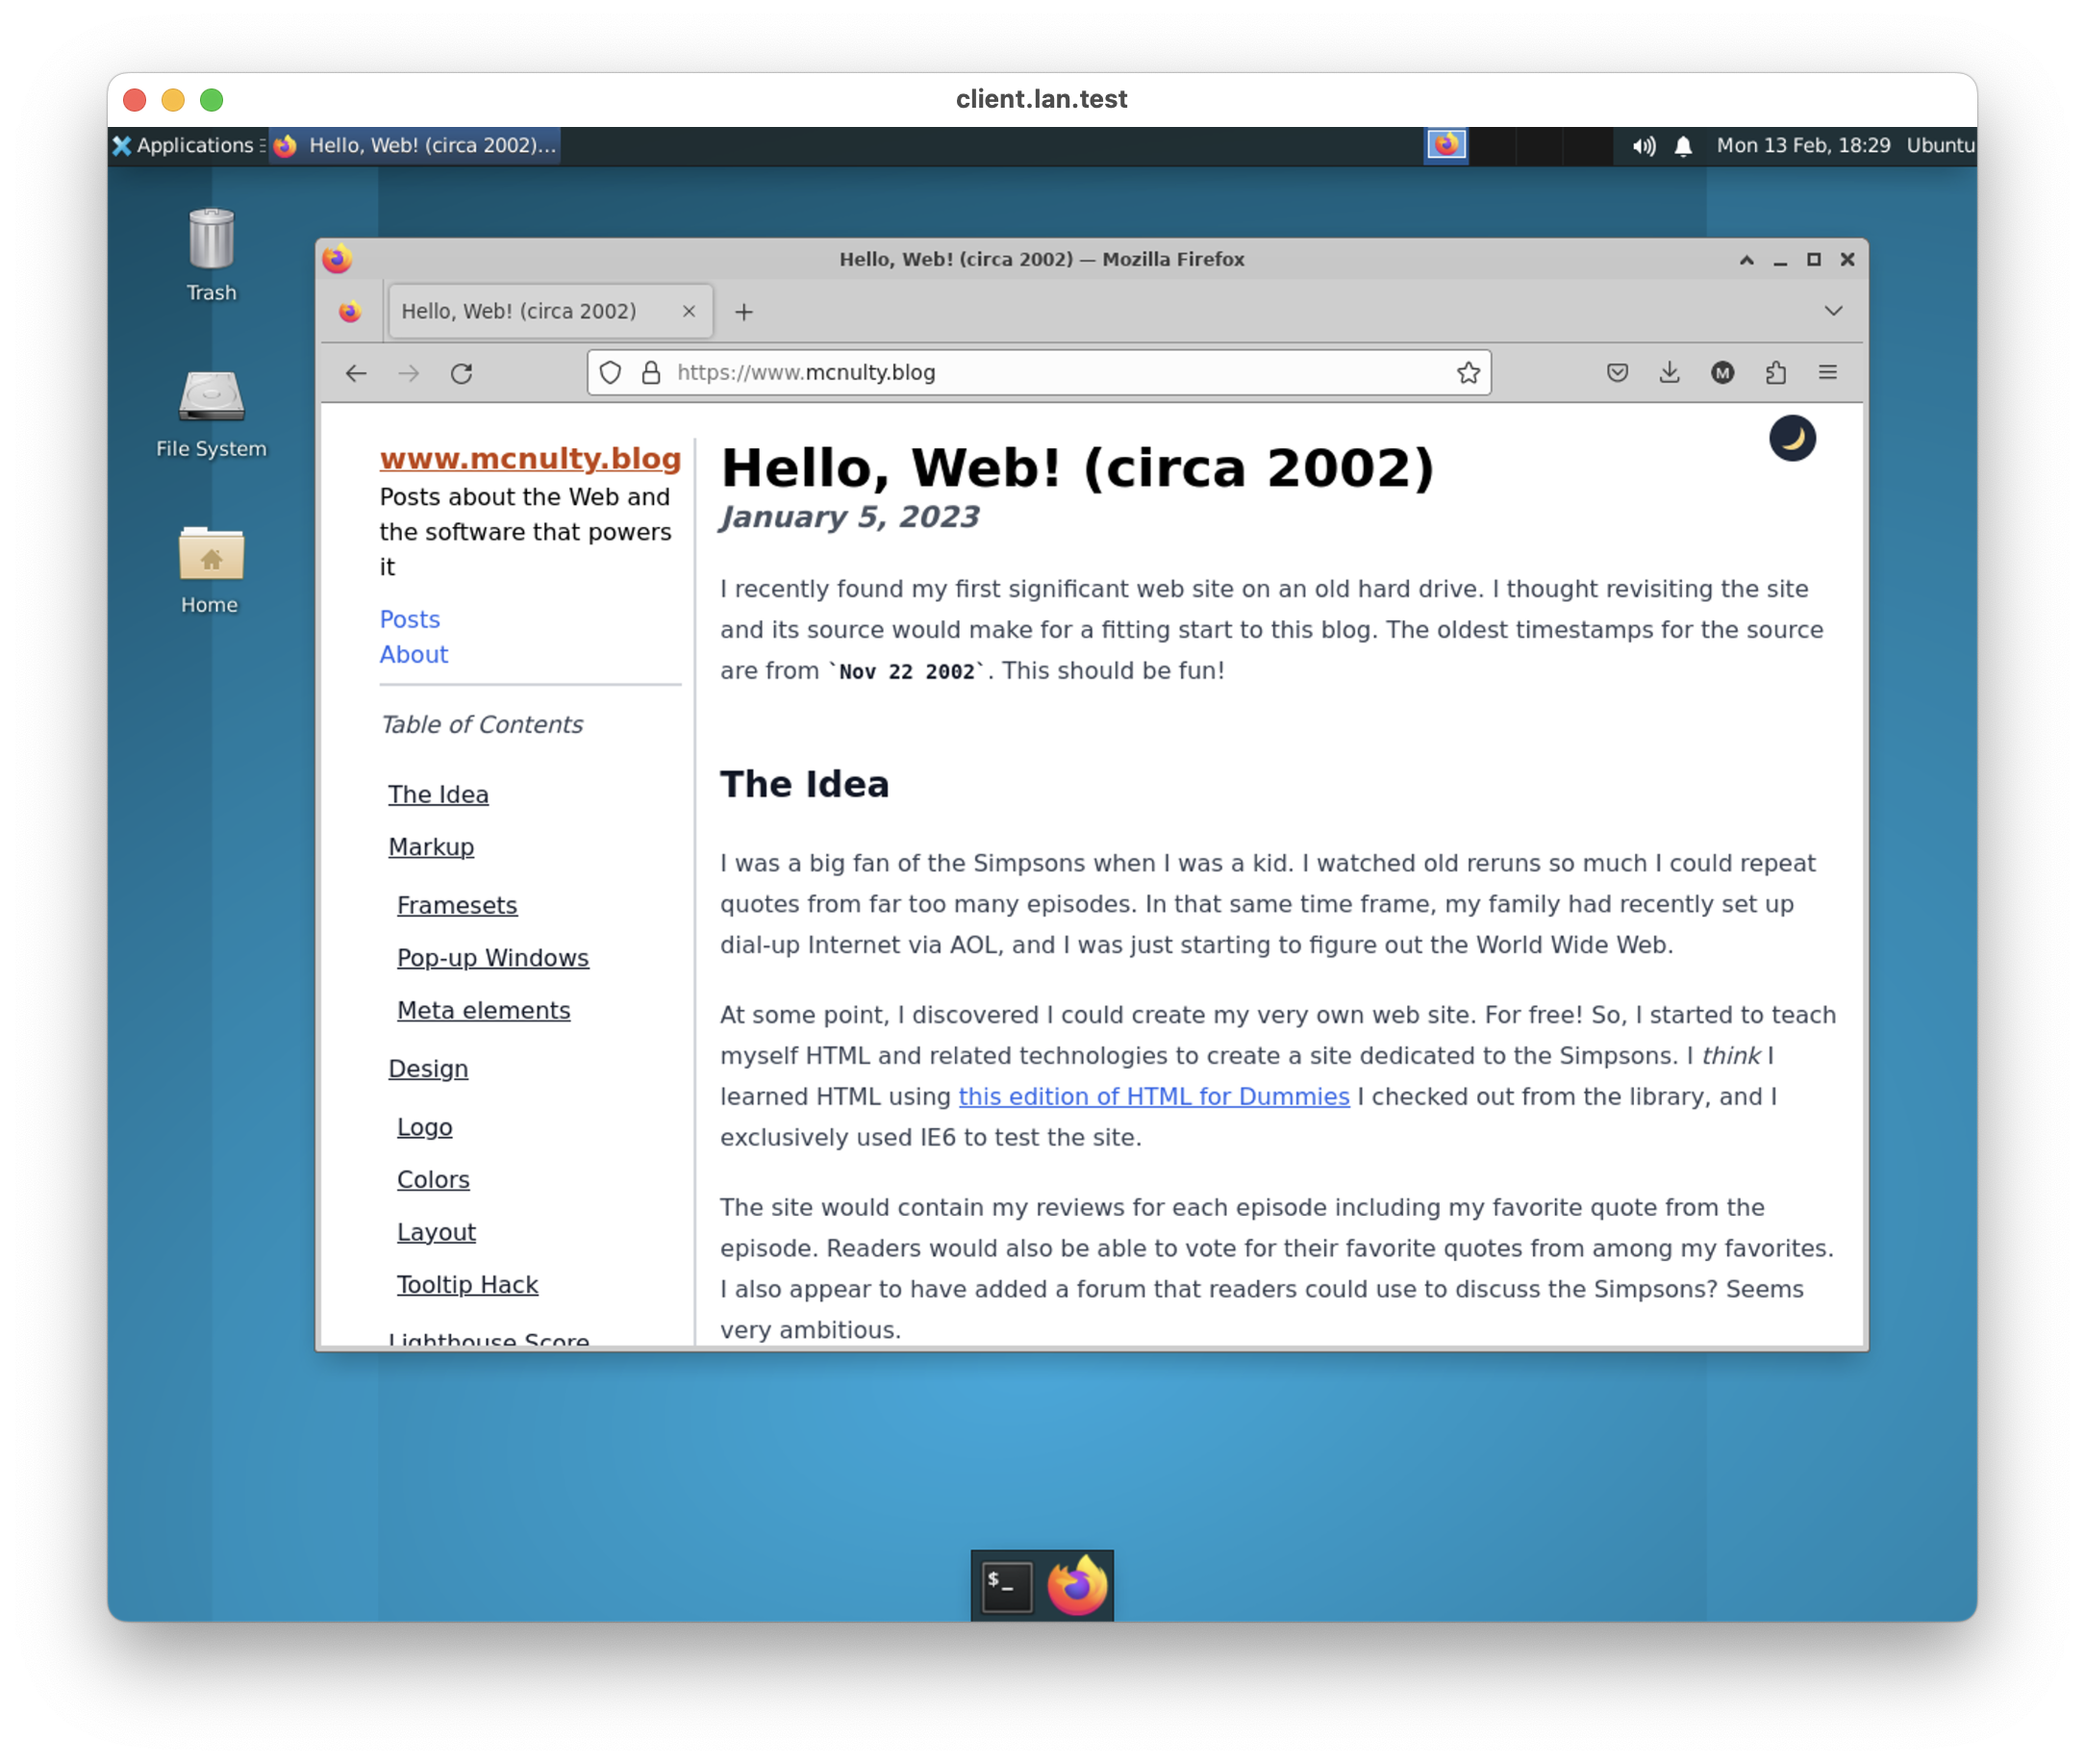
Taking It for a Spin
During development, I validated the lab by requesting http://checkip.amazonaws.com with curl, as it would tell me if there was connectivity and whether the correct route was being used.
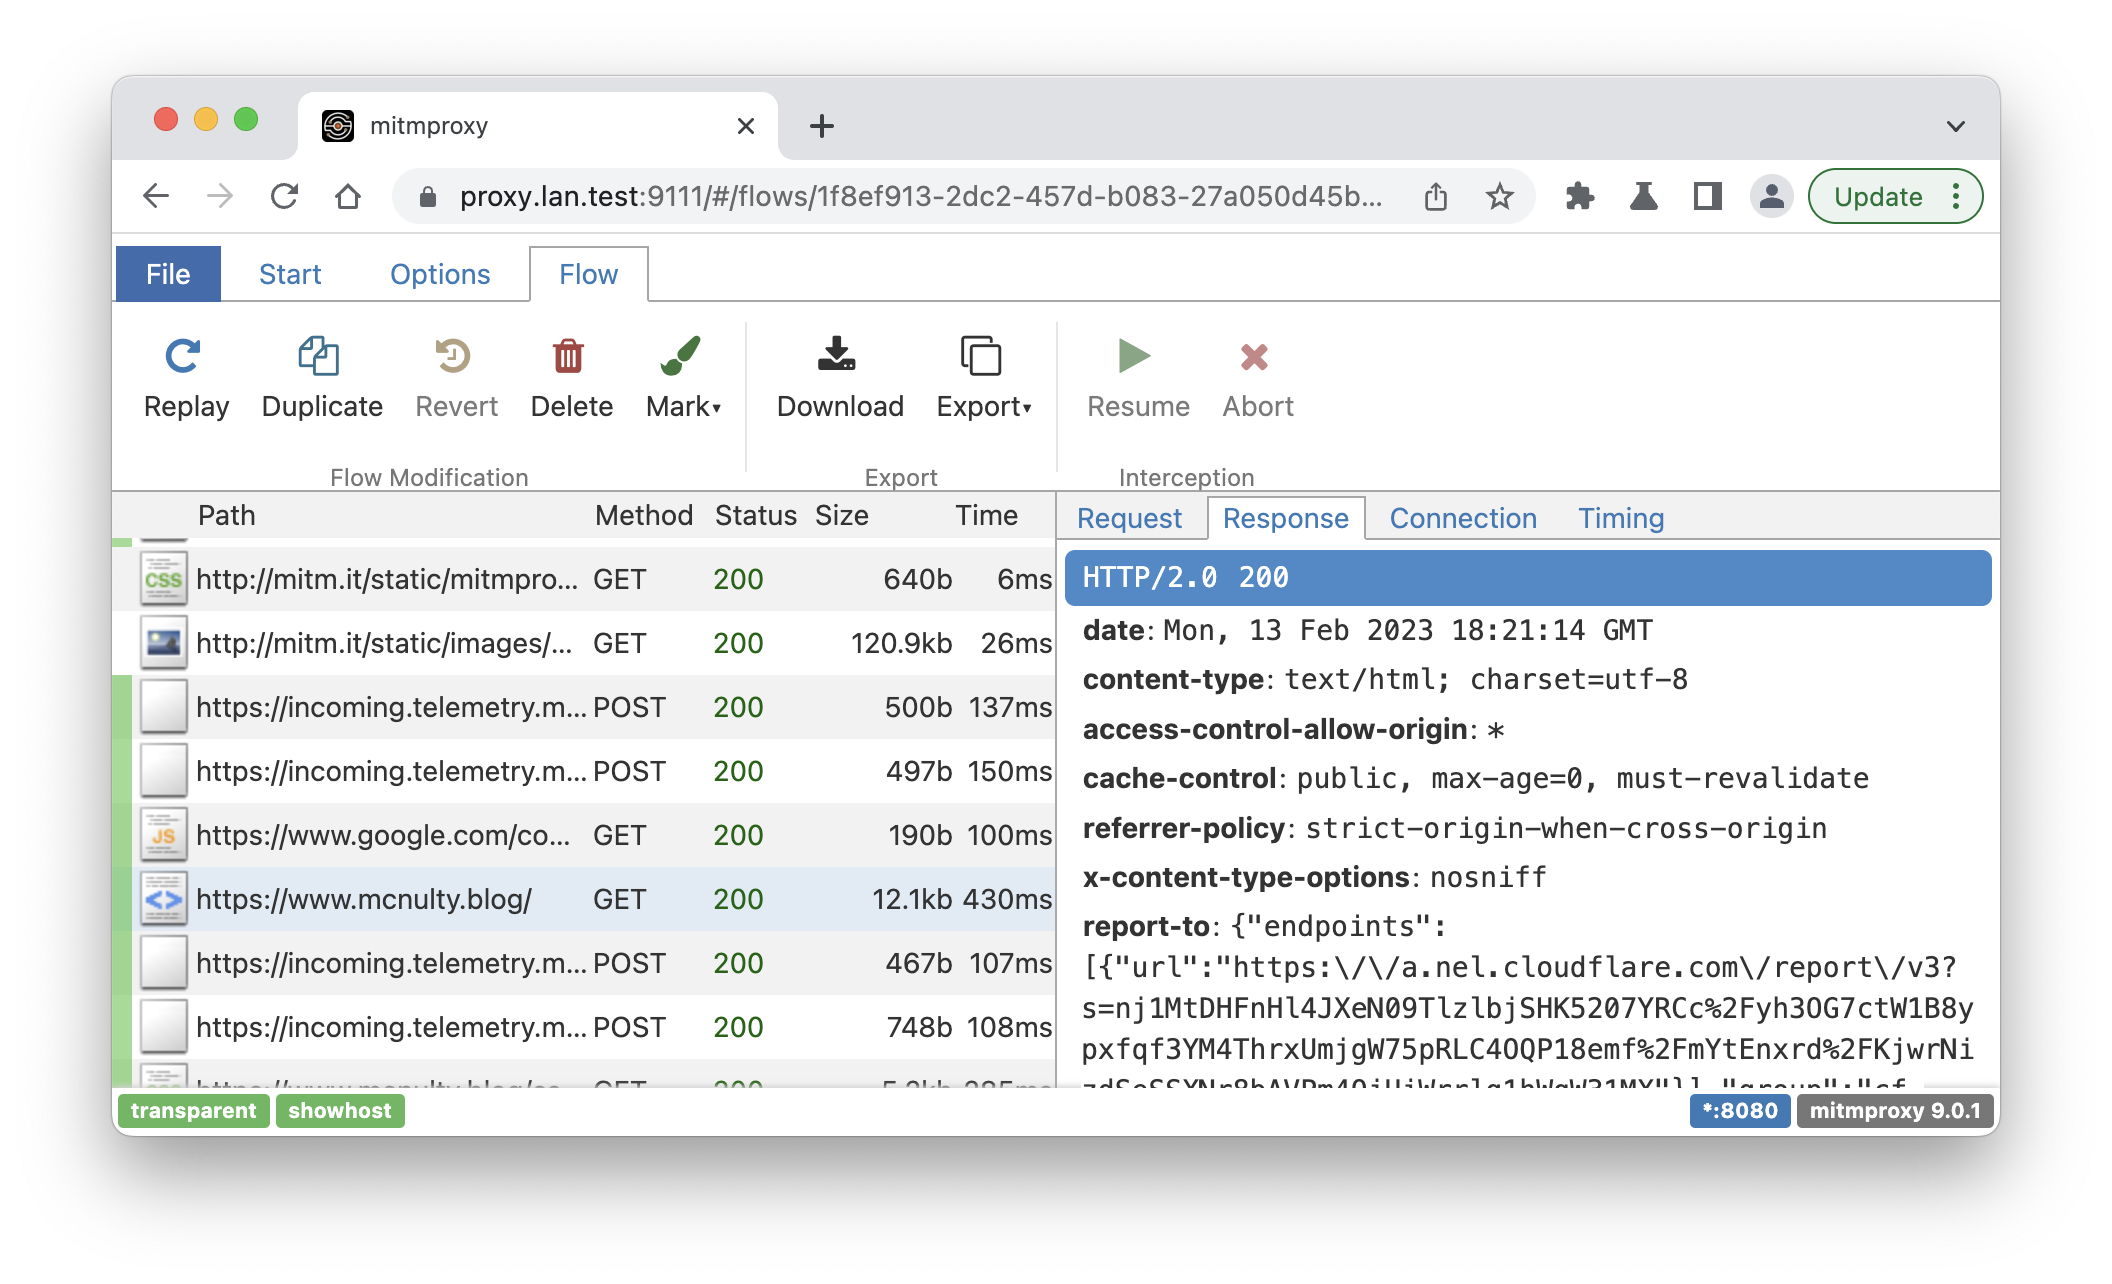
After validating a simple case, I then took a look at the traffic capture for requesting this blog. Here are a few screenshots from that exercise:
A few interesting observations:
- The mitmproxy trace picks up some requests made by the browser that don't show up in the developer tools such as:
- the queries made to Google when typing in the address bar
- the telemetry requests made to Mozilla
- Cloudflare Pages is setting the CORS
access-control-allow-originheader field to*.- This is not an issue for my blog as it is a static site, but good to know if that changes in the future.
Before running this test, I did have to install the mitmproxy certificate to allow it to intercept TLS traffic. This can be done by navigating to http://mitm.it, which provides directions for downloading the CA certificate used by the proxy node, and installing it in Firefox's trust store.
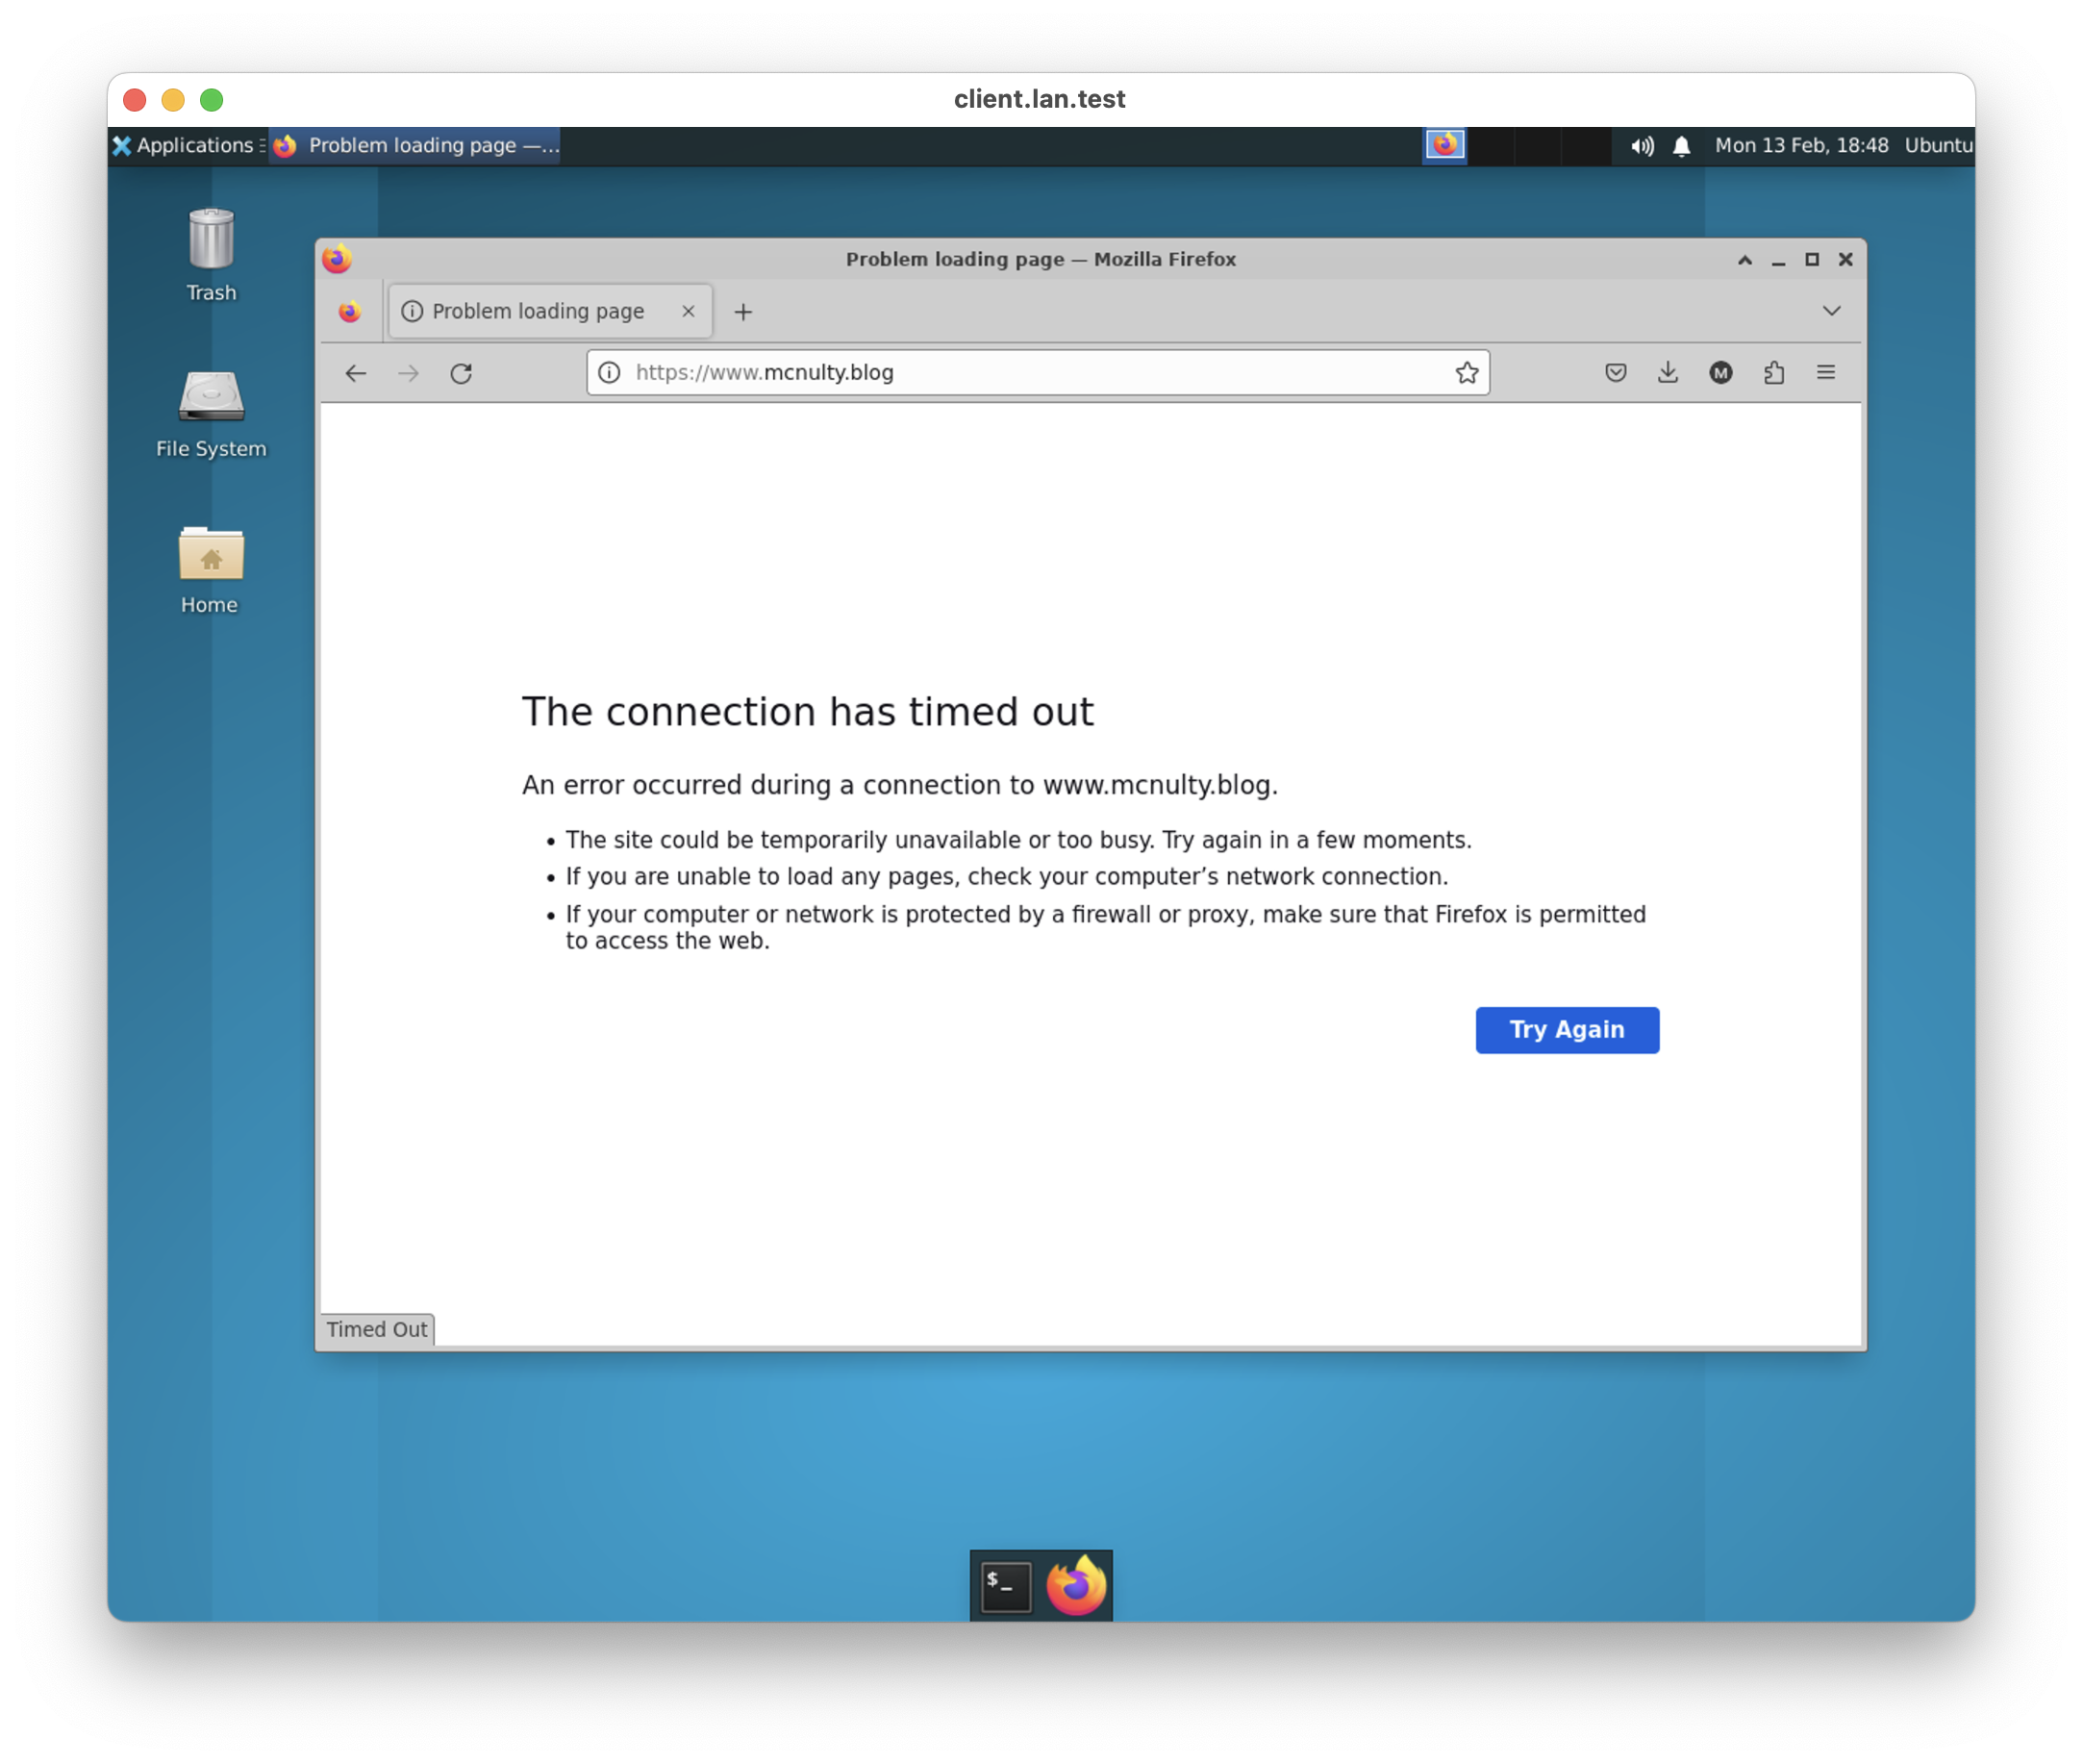
After running this test, I then destroyed the exit node and refreshed the Firefox page. As expected, the request timed out.
False Starts
As I mentioned a few times throughout this post, I took a very circuitous route (no pun intended? 😛) to reach the config documented here. This section documents a few false starts I took along the way.
Podman
I initially tried to use Podman instead of LXD. Podman is a replacement for Docker that does not require a rootful daemon running to launch and manage unprivileged containers. I had previously done some work to get Podman running on my local Ubuntu server and I find Podman/Docker to have a better user experience than LXD when it comes to quickly creating containers that can be easily created and destroyed.
I ran into issues trying to meet my networking requirements for the containers. Specifically, the default Podman configuration results in containers that cannot communicate with one another. The linked documentation mentions that to enable communication you have two options:
- Map container ports to the host network and communicate using the host network
- This is a non-starter for me as I want the traffic completely isolated from the host network
- Deploy the containers in the Pod (as in a Kubernetes Pod)
- This is also a non-starter because containers then use localhost to communicate with one another. This would require the desktop and proxy nodes to be very aware of each other.
At this point, I gave up on Podman because I knew that LXD had more sophisticated networking support. Re-reading the Podman documentation now, I see that it does support bridge networking like LXD, but I suspect it would be a more ad-hoc experience as compared to using LXD's out-of-the-box features.
Remote Desktop Access
Once I settled on LXD, I spent far too much time trying to sort out remote desktop access to the Ubuntu desktop container.
LXD has native support for connecting to the console of a container, via its lxc console command, if it is launched as a virtual machine. This is an attractive solution as it does not require any network port mapping to access the console as the LXD connection is used.
I suspect this command works flawlessly on Linux, but it appears to be a work-in-progress for macos. If you launch a VM and run the appropriate lxc console command, it will fail saying it couldn't find virt-viewer or spicy.
At this point, I installed spice-gtk from HomeBrew, which installed the spicy client. Running lxc console succeeded, but I then found that copy and paste did not work in the spicy client, and searching revealed that spicy is more of a test client. virt-viewer was recommended instead.
So, I tried to install virt-viewer via this HomeBrew formula. The install failed with unclear errors. I also noticed that it was installing an older version of virt-viewer.
Next, I then proceeded to build virt-viewer from source. I figured that out after some time. But, then trying it out, it crashed when I went to do a copy and paste. Okay, back to the drawing board.
I then determined xrdp was worth trying. I made the mistake of trying to get this working in an Ubuntu LXD VM instead of a container. It turns out there are issues with the Ubuntu LXD VM starting an X session by default, and xrdp does not work well with that.
At this point, I switched back to a standard LXD container image, and everything fell in to place shortly thereafter. The end result was some Ansible tasks to set up XFCE and xrdp, which was surprisingly simple.
Tailscale
Tailscale is a management service for setting up a WireGuard overlay VPN between hosts on any network. It greatly simplifies the WireGuard configuration, and gracefully handles roaming between networks without any user involvement. I originally intended to use Tailscale to implement the WireGuard tunnel due to its ease of use. On Ubuntu, it only requires installation of a package and authenticating to the Tailscale service with an API key.
To communicate with the Tailscale service, both WireGuard nodes would have to be able to communicate with the public Internet. For the exit node, this is not an issue. But for the proxy node, this requirement is at odds with my goal to ensure that all egress traffic goes over the WireGuard tunnel.
As mentioned in the Setting up the WireGuard Tunnel section, I used a LXD network ACL to ensure that the only egress traffic allowed from the LXD network bridge would be traffic destined for the exit node on the WireGuard port.
However, with Tailscale in the mix, this ACL would have be more complicated, as the ACL would have to allow traffic to Tailscale coordination servers.
I briefly explored how I would could enhance the ACL to open up egress to the Tailscale servers, and I found this Tailscale article about adding exceptions to a firewall for a Tailscale node to communicate with the coordination servers. The article definitely recommends against this approach, and further, it recommends automating the configuration if you ignore that warning.
I looked into automating it, but decided it wasn't worth it. For example, as could reasonably be expected, DNS load balancing is in use for the login.tailscale.com domain. This would imply that I would need to have a service running external to the LXD network that could monitor changes in the IPs resolved from that domain, and update the ACL in real-time. This would be super complicated. So, I switched gears and started researching WireGuard.
Setting up WireGuard directly instead of using Tailscale was the correct choice in the end, as there are definitely less moving parts to making the WireGuard tunnel work. However, I did pay the cost of having to learn a ton about WireGuard and configuring it appropriately. So, I definitely traded some implementation time for the sake of simplicity.
Lessons Learned
This was a really fun project! It was definitely frustrating at times, especially when I would hit a dead end with an approach. But, overall, a very useful learning experience. Here are some of my lessons I learned:
When to Use Ansible
I had a few false starts where I was developing an ad-hoc shell script when I should have been using Ansible, as it would have greatly simplified things. Reflecting on this experience, I came up with the following flow chart to help me decide between using Ansible or a shell script in the future.
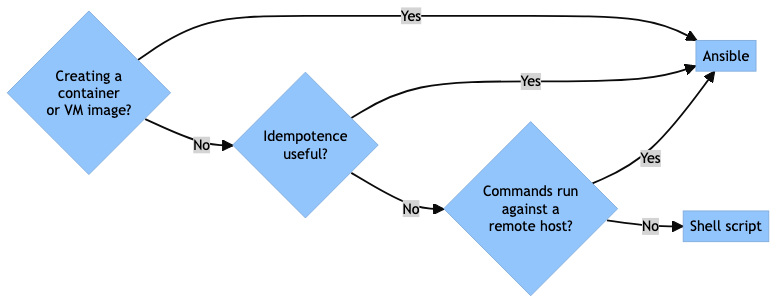
So, basically, I probably need a good reason not to use Ansible for future, similar projects.
Ansible Interactive Debugger
Before this project, I had never used the Ansible debugger functionality. I was missing out!
I found enabling it via an environment variable was the best for my workflow. I would include export ANSIBLE_ENABLE_TASK_DEBUGGER=True before invoking ansible-playbook. Then, when a task invariably fails, I could change the config of the task, and re-run it.
Before using the debugger, I re-run the whole playbook to get back to the failed task. This can be really inefficient for long playbooks. The interactive debugger improves this significantly.
Don't Mix and Match Firewall Frontends
As mentioned in the NAT All the Things! section, there are three different firewall frontends in use in this project. In retrospect, I wish I would have picked ufw from the start instead of using iptables for the proxy node. Translating between the different frontends can be difficult, and it seems like ufw has the best user experience.
Future Enhancements
As specified here, this lab meets my original requirements. However, I think there are a few enhancements I could make in the future to make it even better:
Route DNS queries over the WireGuard tunnel
Currently, DNS queries in the containers are handled by a DNS server managed by LXD, running on the container host. Inside the containers, the DNS server is reached by sending queries to the LXD network bridge gateway. Packet routing is then used to send the queries to the host DNS server, which in turn uses the DNS configuration from the Ubuntu server. The server is currently configured to use my local network router.
As a result of this setup, traffic originating in the containers may be using IPs that may differ from the IPs that may have been resolved by the exit node. Ubuntu has some documentation for setting up some overrides so traffic destined for the tunnel use a different DNS server.
Using a different DNS server than the exit node should not cause any issues. It may result in some oddness if the targets are using geographically-weighted DNS load balancing. It may also be handy for finding vulnerabilities related to cross-region consistency 😉.
Vultr Region Selection
Right now, the exit node is hardcoded to be deployed in a specific region. It may be useful to direct the desktop traffic through a specific region, to probe for vulnerabilities triggered by cross-regional differences or cross-region replication for a particular service.